This is a short post following on from last week's article about how to lock CMS fields in the Webflow Editor.
We were able to target and edit specific fields because Webflow includes field names in the data-automation-id attribute on elements.
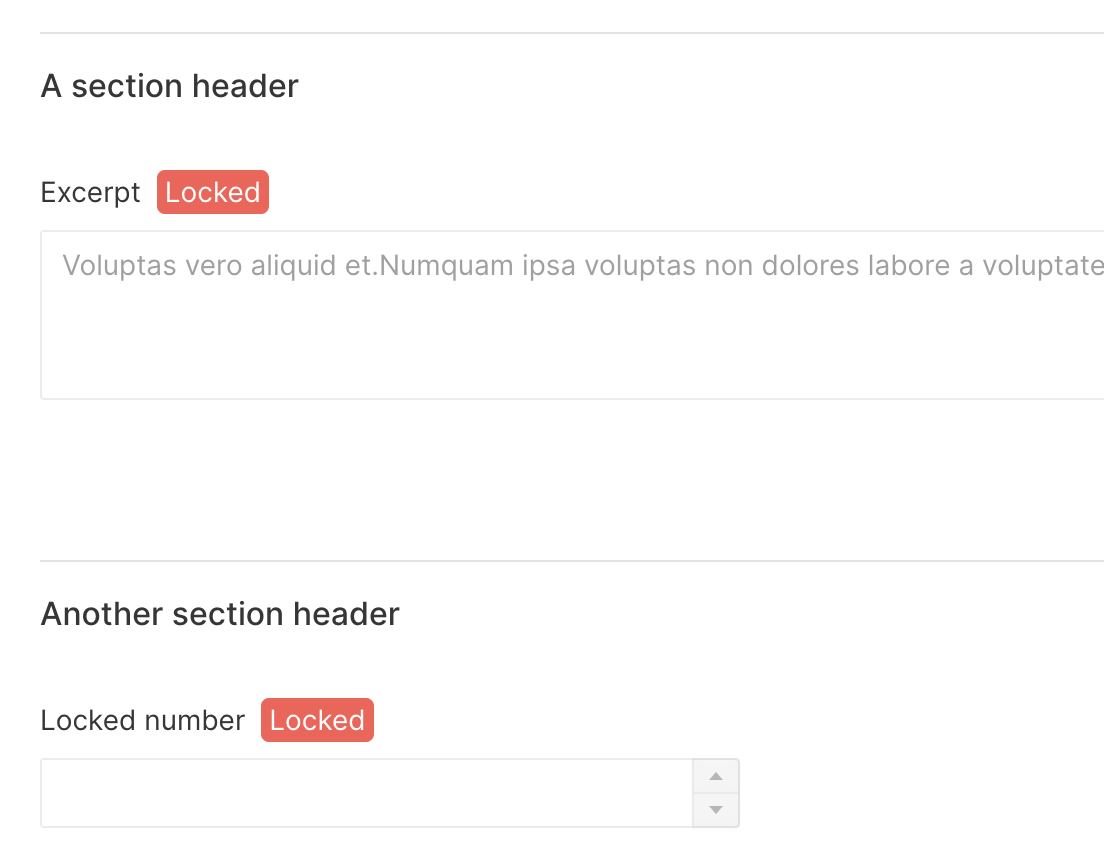
We can use this same fact to add section headers before fields to visually group them and add additional context.
For example, you might wish to separate out all fields related to SEO (meta-description etc), if these were going to be edited by a different team member. Or perhaps you want to make it clearer which fields are for developer use only.
Styling a header
We start by adding a plain text field (we could use another field type, but this is simplest) with the name Editor section header.
The value of the data-automation-id attribute on the field label and input elements will then include the text editor-section-header.
Note - as mentioned in the previous post - this attribute displays the original field name only (this is the same name as used in the Webflow API), and will not update if you change it later.
We can then target the field label and modify the styling to make it look like a section header:
.w-editor-bem-Field_Label_Text[data-automation-id*="editor-section-header"] {
  display: block; /* not strictly necessary for the label element, but if you use a psuedo element you would need this */
  border-top: 1px solid #e3e3e3;
  width: 100%;
  padding-top: 1rem;
  margin-bottom: 1rem;
  margin-top: 4rem;
  color: #363636;
  font-size: 16px;
  line-height: 20px;
  font-weight: 500;
 }
Here we're tweaking the text styling, and adding a full-width border-top. We're also adding some spacing before and after the header.
We also need to hide the field input itself since this isn't used for anything.
.w-editor-bem-TextInput[data-automation-id*="editor-section-header"] {
  display: none;
}
Changing the header text and adding multiple headers
Since the field name used in the data-automation-id is now 'locked in' and won't change, we can go back and change the field name in the Designer to whatever we want it to be.
Here's the great thing about using the *= attribute selector above - it matches against any field names including the string editor-section-header. So we can reuse this styling.
Want to add multiple section headers? No problem - create a new simple text input and call it Editor section header 2 (Webflow won't let you reuse the original Editor section header name).
Re-order the field as desired, save the Collection, then go back and change this field to the required text. Bingo - multiple section headers.
Another way - using a pseudo element
Of course, by using the actual field label for our section headers, we're 'using up' a field. And Webflow has some pretty tight limits on field numbers.
An alternative is to instead use a pseudo ::before element on a 'real' field, so you can continue to use the field itself. This would be the first field in your section/group. For example:
.w-editor-bem-Field_Label_Text[data-automation-id*="my-field-name"]::before {
  content: "My section name";
  border-top: 1px solid #e3e3e3;
  ... /* rest of styling */
}
Obviously make your field name fairly unique so you're not applying this styling to other CMS collections where it's not wanted.
Disclaimer and a silly thing
I'm keen to stress that we probably *shouldn't* be tweaking the Webflow interface [too much]. Quite apart from the fact there's probably something in the T&C about it, it *could* result in unexpected behaviour for your users. So do your own testing, use at your own risk etc etc 🙃.
As has been pointed out on Twitter - these sort of features (locking, grouping etc) are things you'd hope a CMS or database would provide, so hopefully Webflow add these natively in future.
But in the meantime... let's add some funky glowing neon effects to a field heading in the Editor, because we can! ✨
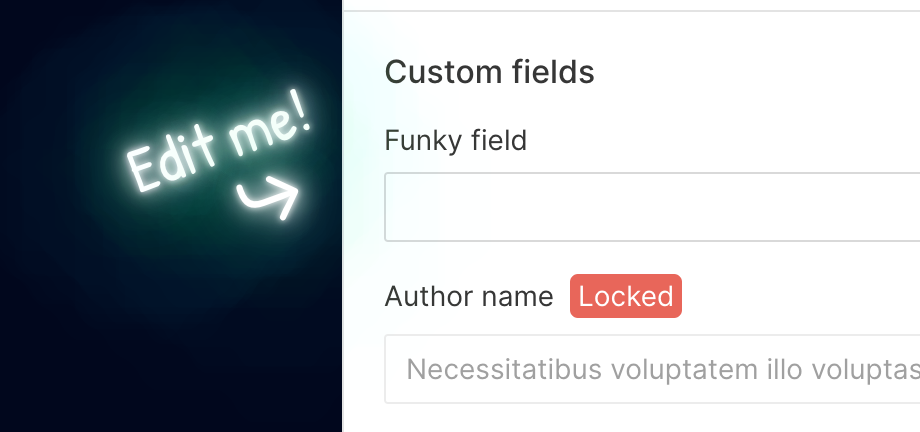
The code for this (don't do this...)
@import url('https://fonts.googleapis.com/css2?family=Patrick+Hand&display=swap');

/* neon effect taken from CSS Tricks https://css-tricks.com/how-to-create-neon-text-with-css/ */

.w-editor-bem-Field_Label_Text[data-automation-id*="edit-me"]::before, .w-editor-bem-Field_Label_Text[data-automation-id*="edit-me"]::after {
	position: absolute;
	color: #fff;
	text-shadow:
      0 0 7px #fff,
      0 0 10px #fff,
      0 0 21px #fff,
      0 0 42px #0fa,
      0 0 82px #0fa,
      0 0 92px #0fa,
      0 0 102px #0fa,
      0 0 151px #0fa;
	animation: pulsate 1.5s infinite alternate;
	transform: rotate(-20deg);
}

.w-editor-bem-Field_Label_Text[data-automation-id*="edit-me"]::before {
  display: block;
  left: -130px;
  content: "Edit me!";
  font-family: 'Patrick Hand', cursive;
  font-size: 2rem;
}

.w-editor-bem-Field_Label_Text[data-automation-id*="edit-me"]::after {
  content: "\2937";
  left: -75px;
  top: 30px;
  color: white;
  font-size: 2.5rem;
}

@keyframes pulsate {
  100% {
      text-shadow:
      0 0 4px #fff,
      0 0 11px #fff,
      0 0 19px #fff,
      0 0 40px #0fa,
      0 0 80px #0fa,
      0 0 90px #0fa,
      0 0 100px #0fa,
      0 0 150px #0fa;
  }
    0% {
      text-shadow:
      0 0 2px #fff,
      0 0 4px #fff,
      0 0 6px #fff,
      0 0 10px #0fa,
      0 0 45px #0fa,
      0 0 55px #0fa,
      0 0 70px #0fa,
      0 0 80px #0fa;
  }
}

.w-editor-bem-Pane_Body {
  background-color: #01061e !important;
}