The other day I had a small issue with a client editing data within the Webflow CMS that I didn't want them to touch.
In this case, the site had an interactive portfolio map powered by the CMS. Text fields in the CMS contained strings of GeoJSON that were creating different elements on the map.
The client was trying to modify the map in a way that it wasn't originally intended to be used. Despite having provided guidance notes when handing over the site, and writing "DO NOT EDIT" in caps in the descriptions for the GeoJSON fields, the client had managed to modify these text fields, temporarily breaking the map.
This got me thinking about ways to lock down specific CMS fields so they can't be modified by an Editor.
TL;DR
The Webflow Editor stores field names* within the data-automation-id attribute on certain elements. We can limit or remove client access to specific fields* in the Webflow Editor by targeting these elements using the attribute selector and hiding / modifying them with CSS.
Jump to the end of this article for some CSS you can copy ✨.
*note the caveats below!
The HTML structure of a basic text field in the Editor
As Webflow-extraordinaire Vincent Bidaux is fond of saying - Webflow itself is just made of HTML and CSS, so we can (with care) use these tools to modify it to our needs.
Let's take a look at a typical single-line text field in the Editor.

<div class="w-reset w-editor-bem-Field ">
	<div class="w-reset w-editor-bem-Field_Head ">
		<div class="w-reset w-editor-bem-Label w-reset w-editor-bem-Field_Label">
			<div class="w-reset w-editor-bem-View" style="display: flex;">
				<!-- we're interested in the div below -->
				<div data-automation-id="dyn-item-author-name-label" class="w-reset w-editor-bem-Field_Label_Text" style="max-width: 100%; overflow: hidden; text-overflow: ellipsis; white-space: nowrap;">Author name</div>

			</div>
		</div>
	</div>

	<!-- and this input below -->
	<input type="text" rows="1" data-automation-id="dyn-item-author-name-input" class="w-reset w-editor-bem-TextInput  " value="Necessitatibus voluptatem illo voluptas blandit" data-dashlane-rid="c8beafb7835aef95">

</div>
There's various nested <div>s for the field label, and then the <input> element itself below.
What's interesting (and super handy for our needs) is that the field name "Author name", is stored within attributes on both the label and input elements (in kebab-case).
data-automation-id="dyn-item-author-name-label"We can then use class and attribute selectors to target either of these elements based on the field name.
For example, this selector below targets labels for fields whose name contains the phrase "author name",
.w-editor-bem-Field_Label_Text[data-automation-id*="author-name"] {}And this similarly targets the input itself:
.w-editor-bem-TextInput[data-automation-id*="author-name"] {}Adding some CSS
Ok, now what? We can target these elements, what do we want to do?
Pointer events
Well, we could disable pointer events on the input. That stops an Editor from clicking on a text field.
.w-editor-bem-TextInput[data-automation-id*="author-name"] {
	pointer-events: none;
}
However they can still tab into the field and then edit it. And we can't control tab behaviour using CSS alone.
Visual indicators
We can make it clearer to a user that they shouldn't modify these fields by greying out the label and/or field - for example:
.w-editor-bem-Field_Label_Text[data-automation-id*="author-name"] {
	color: #d3d3d3;
}
.w-editor-bem-TextInput[data-automation-id*="author-name"] {
	pointer-events: none;
	opacity: 0.5;
}
And we can add a psudeo ::after label to the label as well.
.w-editor-bem-Field_Label_Text[data-automation-id*="author-name"]::after {
	content: "Locked";
    margin-left: 8px;
    display: inline-block;
    background-color: #EA6556;
    color: white;
    padding: 4px;
    line-height: 1;
    border-radius: 4px;
    pointer-events: none;
}
But of course, as before, the user can still tab into this input, so we still run the risk of them editing it.
Hiding the field
The only way of removing this risk with CSS - is to hide this input with display: none
.w-editor-bem-TextInput[data-automation-id*="author-name"] {
	pointer-events: none;
	display: none;
}
Obviously this means the editor can't see the field contents, which may or may not be important to you.
Taking this a bit further with :has
The shiny new CSS selector :has lets you target a parent based on the properties of a child element. It's ace! Read more about it here.
We can use this to target the whole field, instead of just the label and input elements. For example, just using opacity again:
.w-editor-bem-Field:has(.w-editor-bem-Field_Label_Text[data-automation-id*=“author-name”]) {
	pointer-events: none !important;
	opacity: 0.5;
}
You could then apply styling to the whole field elements. This can come in handy when locking different field types, where there are various different child elements to disable or style, some of which don't have the data-automation-id attribute on them (I dig into the different field types below).
But... (and it's a big 'but')
Unfortunately :has only has support in the latest version of Safari. So you might need to wait a while before using this method on production sites.
Bear in mind there is also a bug (feature?) on Safari when using the Editor - users often see a "third party cookie" pop-up when trying to log in. I've had success by unchecking the "Prevent cross-site tracking" checkbox in Safari Privacy preferences, but YMMV. Read more on the forums here.
Using a single keyword to target fields
So we know we can target fields based on their field names. But we don't want to be duplicating the same CSS over and over if we have lots of field names to hide. Can we come up with a way of targeting multiple fields at once?
One way would be to add a specific keyword to all these field names. For example, starting (or ending) all field names with "Locked". Of course, it would need to be a word that you wouldn't use in any other field names.
But! (it's a slightly smaller 'but' this time).
The field name you see in the attributes on the elements appears to be the same field name used by the Webflow API. This will always be the original value of a field name.
If you create a CMS field called "Author name" and then later change it to "Author name - locked", the field name shown in the attributes will be author-name, not author-name-locked.
So if you decided at a later date to lock (or unlock) a specific field, you would need to create a new field and migrate the data. This is obviously a lot easier now that Webflow has added updating through CSV uploads, but it would still be a bit of a pain.
Where to put this CSS?
We'll want this CSS to appear on all pages of the site, so I'd suggest adding this to the site-wide custom code section. I normally add custom CSS within a symbol I reuse on all pages of a site - but you need to ensure it appears on all pages so the Editor styling is consistent, whichever page the user is on.
Other element types
In the examples above we've only been looking at a regular 'ol single line plain text <input> field. What about other Webflow field types?
Here's a list of all (?) field types and whether we can or can't target the relevant elements to hide them.
For all of these, the class on the field label element is the same, so you can use the same styling (e.g. the pseudo ::after element) for all label elements.
Plain text (multiline)
This has the same class as single line text fields, there's just a <textarea> element instead of an <input> element. But it will still work with the CSS we've used above.
Links, video, telephone and email fields
These have the same class as single line plain text fields, so no changes needed here to target.
Rich text
Rich text fields are formed of a whole bunch of nested divs and other elements - but we can still target the containing div, we just need to adjust the class in the selector:
.w-editor-bem-RichTextInput_Content[data-automation-id*="locked"] {
pointer-events: none;
display: none;
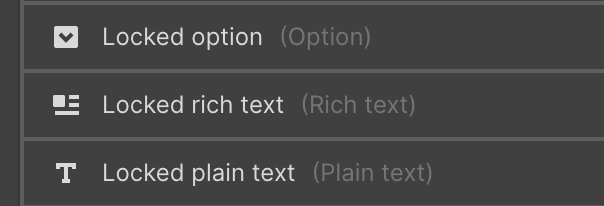
}Options
Options (aka dropdowns) are again slightly more complex than just native input fields. But we can again just target the containing div.
Note that we need an !important; on the display:none to supersede some inline styling Webflow is applying to the element directly.
.w-editor-bem-SelectInput_Trigger[data-automation-id*="locked"] {
	pointer-events: none;
	display: none !important;
}
Numbers
NB I've only tested basic number fields (no decimals, negatives etc).
Number fields have a few elements - a standard <input> field (same as the plain text field etc) followed by the up/down controls. To target the controls we would add:
.w-editor-bem-NumberInput_Ticks_Button[data-automation-id*="locked"] {
	pointer-events: none;
	display: none !important;
}
Again we need the !important; because of inline pre-existing styles.
Switch / toggle
I don't quite understand how switches work 😅 - but no matter, we can simply target the outer element again:
.w-editor-bem-Switch[data-automation-id*="locked"] {
	pointer-events: none;
	display: none !important;
}
Images and files
The structure of the image field changes depending on whether there's an image selected.
Unfortunately, when there is an image selected, the field name doesn't seem to be stored on the image controls at all, so we can't target these and lock them. Boo.
The field name is stored on the little preview image that's shown adjacent to the controls, so using the :has selector, we could target the controls themselves by doing something like:
.w-editor-bem-ImageInput:has(div[data-automation-id*="locked"] .w-editor-bem-ImageInput_Controls) {}In other words - "find the parent element that has a descendent with the locked attribute, and get a different descendent with the controls class".
But note the point above about support for :has.
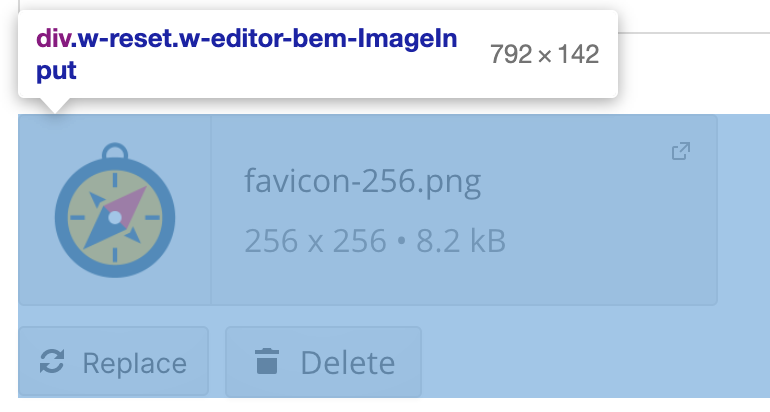
File fields are set up the same way as image fields.
References (single)
Again, a couple of elements to target here - a select-type element (which is the same as the Option field above), and a plus button on the right hand side to create new CMS items.
.w-editor-bem-Button-inline[data-automation-id*="locked"] {
	pointer-events: none;
	display: none!important;
}
References (multi-select)
Unfortunately we can't target these at all in the same way (without using :has) as the main control doesn't have the attribute we need.
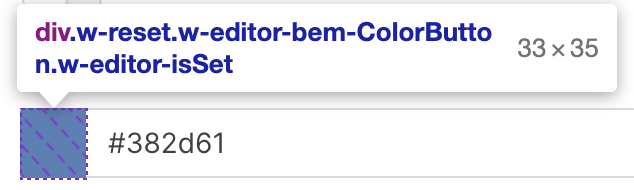
Colors
This uses the same type of input element as plain text fields... but - it also has a button on the left hand side, which unfortunately we can't target.
So no locking color fields (again, unless you use :has).
Dates
Same as colors - an input we can target, but a button we can't.
Bringing this all together
Let's tidy all this up shall we? We can combine all these rules into a single rule, plus one for adding the little "locked" tag to the field labels.
/* hide controls for plain text, rich text, single references, options, numbers and switches */
/* NB we can't target color, date, multiref, image and file fields */
.w-editor-bem-TextInput[data-automation-id*="locked"],
.w-editor-bem-RichTextInput_Content[data-automation-id*="locked"],
.w-editor-bem-SelectInput_Trigger[data-automation-id*="locked"],
.w-editor-bem-NumberInput_Ticks_Button[data-automation-id*="locked"],
.w-editor-bem-Switch[data-automation-id*="locked"],
.w-editor-bem-Button-inline[data-automation-id*="locked"]
{
	pointer-events: none;
	display: none !important;
}

/* add locked tags to control labels */
.w-editor-bem-Field_Label_Text[data-automation-id*="locked"]::after {
	content: "Locked";
    margin-left: 8px;
    display: inline-block;
    background-color: #EA6556;
    color: white;
    padding: 4px;
    line-height: 1;
    border-radius: 4px;
    pointer-events: none;
}
Caveats
Some important things to flag!
- Remember, you ideally need to decide which fields to lock when you first create them (see "Using a single keyword to target fields" above)
- The above code is the result of some Sunday afternoon tinkering. Do your own testing before using this on a production site.
- Remember, like with other Webflow third-party tools, browser extensions etc, you're making changes to the Webflow interface, not to the HTML of your own site. The Webflow engineers might change how things work at any time!
I love tinkering with tools and pushing them further. Let me know if you try locking fields on a Webflow site like this – or if you have any other ideas!